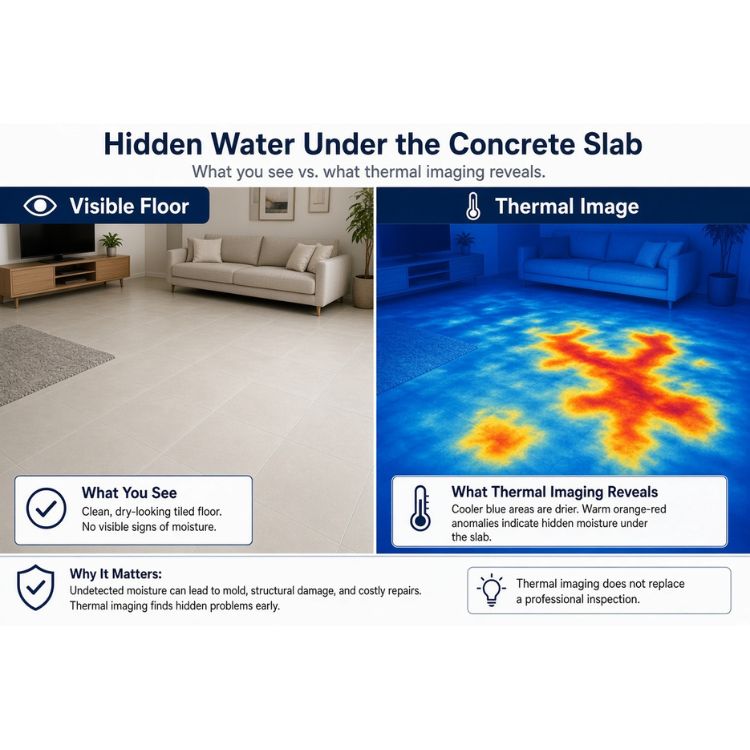
A slab leak rarely announces itself. There's no crawlspace to check, no basement ceiling growing a stain you can point to. The pipe is sealed inside several inches of concrete, and the first thing most homeowners notice is a water bill that doesn't match their usage or a spot on the tile that feels oddly warm underfoot.
Non invasive slab leak detection typically relies on three tools working together: pressure testing to confirm a leak exists at all, thermal imaging to find where it's happening, and a moisture meter to confirm what the camera is seeing. Skip any one of the three and you either can't confirm there's a leak, can't narrow down where it is, or can't be sure a warm spot on camera is actually water. Here's how each piece works, and where each one runs into trouble.
What Tips People Off First
Before anyone brings out equipment, a leak usually shows up through a handful of overlapping clues:
Sign | Likely cause |
|---|---|
Water bill climbs with no change in habits | Continuous underground leak |
Warm patch on the floor | Hot water line leak (most common) |
Cool, damp patch with no clear source | Cold water line leak |
Running water sound with every fixture off | Active pressurized leak |
Warped laminate, curling vinyl, damp carpet | Water's been trapped for a while |
Musty smell near baseboards | |
Sudden drop in water pressure | Line may be compromised |
One of these alone doesn't mean much a warm floor patch could just be sunlight through a window. Two or three together, especially paired with a rising bill, is usually what gets someone to make a call.
Where Detection Actually Starts: Isolating the Leak First
Most professional visits don't open with a thermal camera. They open with a simple pressure or meter test to confirm there's an active leak before spending time trying to locate it.
The most common version: shut off every fixture in the house, note the reading on the water meter, wait a set period without using any water, then check the meter again. If it moved, water is escaping somewhere in the system. From there, a plumber can often isolate whether the leak is on the hot side or cold side by shutting off the water heater's supply valve and watching whether the meter keeps moving. That single step narrows the search before any imaging equipment comes out a hot side leak means the camera should be looking for a warm signature, not a cool one.
This is worth knowing because it changes what "thermal imaging finds slab leaks" actually means in practice. The camera isn't the first tool used. It's the tool used once you already know a leak exists and roughly which line it's on.
The Physics Behind Thermal Imaging
An infrared camera isn't detecting water. It's detecting infrared radiation the heat every surface gives off based on its own temperature and converting that radiation into a color mapped image. A leak only matters to this image because of how it changes the temperature of whatever surrounds it.
Hot Water vs. Cold Water Signature
A hot water line pushes heat upward through the slab as it leaks, so the camera picks up a warm streak or blob tracing roughly along the pipe's path. This is the more forgiving signature to catch it's distinct, and it tends to follow a predictable route back toward the water heater.
A cold water line doesn't give the camera anything direct to read. What shows up instead is evaporative cooling: water trapped under the flooring evaporates slowly, pulling heat away as it does, leaving a patch that's cooler than the surrounding concrete. It's subtler, it spreads less predictably, and it's the signature people miss most often when working with a budget camera or without training.
Shape matters as much as temperature. A radiant floor loop running normally shows clean, straight, evenly spaced lines with no bleeding between them. A leak breaks that regularity the anomaly appears as an irregular blob flaring outward from what should be a straight line. Trained thermographers, including those using higher end FLIR thermal imaging equipment, are reading that contrast specifically, not just scanning for "warm versus cold."
Getting a usable scan takes some setup. Technicians often let the slab settle to ambient temperature first, then run hot water or activate the heating system and scan as the pattern develops. Depending on slab thickness and flooring material, a clear pattern can take anywhere from a few minutes to roughly half an hour to fully form thinner flooring and larger leaks tend to show up faster. Thick carpet or layered flooring dampens the signal further, since heat has to travel through more material before reaching a surface the camera can actually read.
That's also the ceiling on what thermal imaging can do by itself. It reads surface temperature only. It cannot see through concrete, cannot confirm water is present, and cannot tell you depth. A heating duct running under the floor, direct sunlight through a nearby window, even a spot where someone was just standing all of these can produce a signature that looks exactly like a leak to someone without the training to tell the difference.
Where Moisture Meters Come In
A thermal image gives you a suspect. A moisture meter gives you a verdict or at least something much closer to one.
Pin-type meters drive two small probes into the material and run a weak current between them. Water conducts better than dry concrete, so the resistance measured converts into a moisture reading. On dense concrete, standard pins typically only reach a shallow depth often just an inch or two because the material is too hard and too electrically resistant for a short pin to read much further. Reaching deeper requires specialized long probes (sometimes called EL pins), which can extend readings out toward 7 inches, but that means drilling holes deep enough to seat them not something most techs do on a finished floor without good reason.
Pinless meters skip the holes entirely. A sensor pad projects an electrical field into the surface and reads how that field distorts when it hits moisture. Fast, non-damaging, good for scanning but shallow. A pinless moisture meter on concrete typically reads only about 3/4 inch deep. On a slab that's four to six inches thick, that's sampling the top skin of the material, nowhere near pipe depth.
Pin-type (standard) | Pin-type (long/EL probes) | Pinless | |
|---|---|---|---|
Typical depth on concrete | ~1–2 in | Up to ~7 in | ~3/4 in |
Leaves marks | Yes | Yes, more so | No |
Best for | Quick spot checks | Confirming moisture near pipe depth | Scanning wide areas fast |
Common tradeoff | Limited depth | Requires drilling | Surface-only reading |
One thing worth knowing before trusting a number off either device: on concrete, both meter types usually produce a relative reading rather than a precise moisture percentage. The useful comparison isn't "this reads 40," it's "this spot reads noticeably higher than a dry section three feet away." Treat the number as a comparison, not an absolute measurement.
Combining the Tools — and Where Acoustic Detection Fits
On many professional jobs, the real working trio is pressure testing, acoustic listening, and thermal imaging with the moisture meter used as a secondary confirmation step once a specific spot has already been flagged by the other two.
Acoustic detection uses sensitive microphones or ground sensors tuned to the sound of water escaping a pressurized pipe a hiss or rushing sound that travels through concrete and soil more effectively than most people expect. Combined with thermal imaging, it does a lot of the actual pinpointing: the camera narrows a general area, the acoustic equipment narrows that area down to inches by listening for where the sound is loudest, and the moisture meter confirms the final spot before anyone cuts anything.
For jobs where the exact route of the pipe also needs to be mapped not just the leak location plumbers sometimes bring in electronic pipe tracing equipment, which sends a signal down the line and tracks it from the surface with a receiver. That's a separate step from leak detection itself; it answers "where does this pipe run" rather than "where is it broken."
The sequence that holds up in practice:
Confirm an active leak exists with a pressure or meter test, and isolate hot side versus cold side if possible.
Scan the suspect area with the infrared camera, mapping every anomaly rather than stopping at the first one found.
Narrow further with acoustic listening where the anomaly is unclear or spread over a wide area.
Confirm the final spot with the moisture meter before any cutting starts.
Skipping straight from "warm patch on a budget thermal camera" to "cut here" is the most common DIY mistake. It's an easy trap the patch looks convincing but a heating duct or a sunlit section of floor can produce the same visual without a drop of water anywhere near it.
What This Actually Costs
Quotes vary enough by region and provider that citing one number would be misleading. Several published estimates converge loosely around $200–$650 for a standalone detection visit covering thermal imaging, moisture confirmation, and sometimes acoustic tracing though other sources quote lower baseline screenings around $100, and more involved on-site inspections up to $900–$1,200. In some markets, the detection fee gets waived or rolled entirely into the cost if you proceed with the repair through the same company, so it's worth asking about that upfront rather than assuming it's a separate charge either way.
Repair costs vary more, depending on the method:
A targeted spot repair (opening the slab, fixing the pipe, patching) typically runs somewhere in the $900–$2,500 range
Rerouting the line through a wall instead of cutting the slab avoids concrete work but adds materials and labor, often landing around $1,500–$4,500
A full repipe is the largest jump figures from several contractors put this in the $6,000–$18,000+ range depending on home size
Insurance coverage is inconsistent enough that it's worth checking your specific policy rather than assuming. Many carriers cover the cost of locating and accessing a leak that happened suddenly, but exclude damage tied to gradual wear or age and flooring or drywall restoration coverage varies further between insurers. Photograph everything before repairs start if a claim is even a possibility.
When These Tools Don't Work Well
Very small, slow leaks. If the leak rate is low enough that evaporation keeps pace with the water escaping, there may not be enough moisture buildup yet to create a detectable temperature difference.
Leaks under thick flooring. Stone tile, multiple subfloor layers, or engineered flooring with underlayment can insulate the surface enough that heat from below never reaches the camera clearly.
Recently poured or still-curing concrete. New slabs retain construction moisture that can mimic or mask a leak signature for weeks after the pour.
Leaks near exterior walls or under exterior slabs. Ambient outdoor temperature and direct sun exposure interfere with the surface readings a thermal camera depends on.
Mapping the pipe route itself. Thermal imaging and moisture meters find leaks; they don't trace where a pipe physically runs. That's a job for electronic line tracing.
None of this means the tools don't work. It means a single clean scan on a tricky floor isn't the same as ruling out a leak, and a technician worth hiring will say so rather than declaring the house clear after one pass.
Common Questions
Can thermal imaging see through a concrete slab?
No. It only reads surface temperature. It can flag where something unusual is happening beneath that surface, but it can't confirm depth or the presence of water on its own.
Does thermal imaging work through tile, carpet, or hardwood?
To a point. Thinner flooring like tile lets heat through fairly clearly. Thick carpet, padding, or multiple subfloor layers insulate the surface and delay or dull the signature, sometimes enough that a scan comes back inconclusive even with an active leak underneath.
How do plumbers find a slab leak without breaking the floor?
Usually through a combination: a pressure or meter test confirms a leak exists, thermal imaging and acoustic listening narrow down the location, and a moisture meter confirms the final spot. Only after all of that does anyone cut into the slab — and typically just a small, targeted opening rather than a large section.
How accurate is thermal imaging alone for finding a slab leak?
Accurate enough to be a strong starting point, not accurate enough to justify cutting concrete on its own. False positives from sunlight, ductwork, or recent foot traffic are common enough that pairing it with acoustic detection and a moisture meter is standard practice, not an extra step.
Can a pinless moisture meter be used on concrete without drilling holes?
Yes — that's the main advantage of a pinless design. The tradeoff is depth: it typically reads only about 3/4 inch into concrete, which limits it to surface-level confirmation rather than a reading near pipe depth.
Will homeowners insurance cover slab leak detection?
Often for the access and locating costs tied to a sudden leak, less consistently for damage from gradual wear, and restoration coverage depends heavily on the specific policy. Check directly with your insurer rather than assuming either way.
What's the difference between a slab leak and a normal plumbing leak?
A slab leak specifically means the pipe is embedded in or running beneath a concrete foundation, out of sight and reach. A leak under a kitchen sink is usually visible immediately and doesn't need thermal imaging or a moisture meter to locate.